So, after many attempts and experiments I was able to boot my M6000 and bring it back to life!
Soluce:
Use this procedure if your unit crashes during boot (front panel never turns green + floppy disk drive is never accessed).
For the impatients, here is the soluce (see below for the how and why):
Write the M6bv20.ins on a DOS Formatted (FAT32) floppy disk and rename the file to « dumpfile.bin »
Find a 1MB or 2MB SRAM Flash PCMCIA Type 1 (the SRAM characteristic is essential, a simple PCMCIA flash adapter won’t do the trick)
Find a working M6000 unit (ask a nearby studio, this is litellary a 20 seconds manipulation)
Insert the floppy disk and the PCMCIA card on the working unit (unit is ON)
Go into « Frame > System > Main > Card » and press « Dump binary file to card ». The floppy disk is read and dumpfile.bin is written on the pcmcia flash card.
Now eject the floppy disk and extract the PCMCIA card.
Turn your faulty M6000 off
Set the internal DIP switches to OFF OFF ON ON ON ON ON ON
Insert the PCMCIA card and turn the unit ON
The Front panel led will turn orange then green after a few seconds (around 10s)
Turn the unit off and extract the PCMCIA card
Set the internal DIP switches to their default values: ON ON OFF OFF OFF OFF ON ON
Turn the unit ON
That’s it!
After this procedure, your unit should properly boot (front panel led is green) and access the floppy disk drive during boot. If you still have issues, think about reflashing the main software (write S6KAppl.M6K and m6kboot.ctl on a floppy and boot on it).
I recently purchased a « non working » TC Electronic System 6000, here’s a few notes of what I found while trying to fix it.
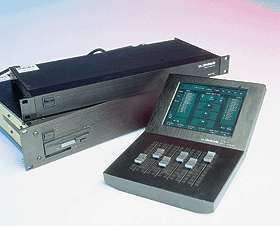
The TC Electronic System 6000 is based on two units:
The Mainframe with a floppy disk drive and a PCMCIA slot
The Remote + Icon
In my case, the remote unit works fine: the system boots properly, shows the Windows NT4 splashscreen and then the M6000 GUI.
The Mainframe unit is another story: the front panel is fixed red and.. stays red.
During a normal boot process, it’s supposed to access the floppy disk drive and the LED turns green once the boot is complete.
The Mainframe parts
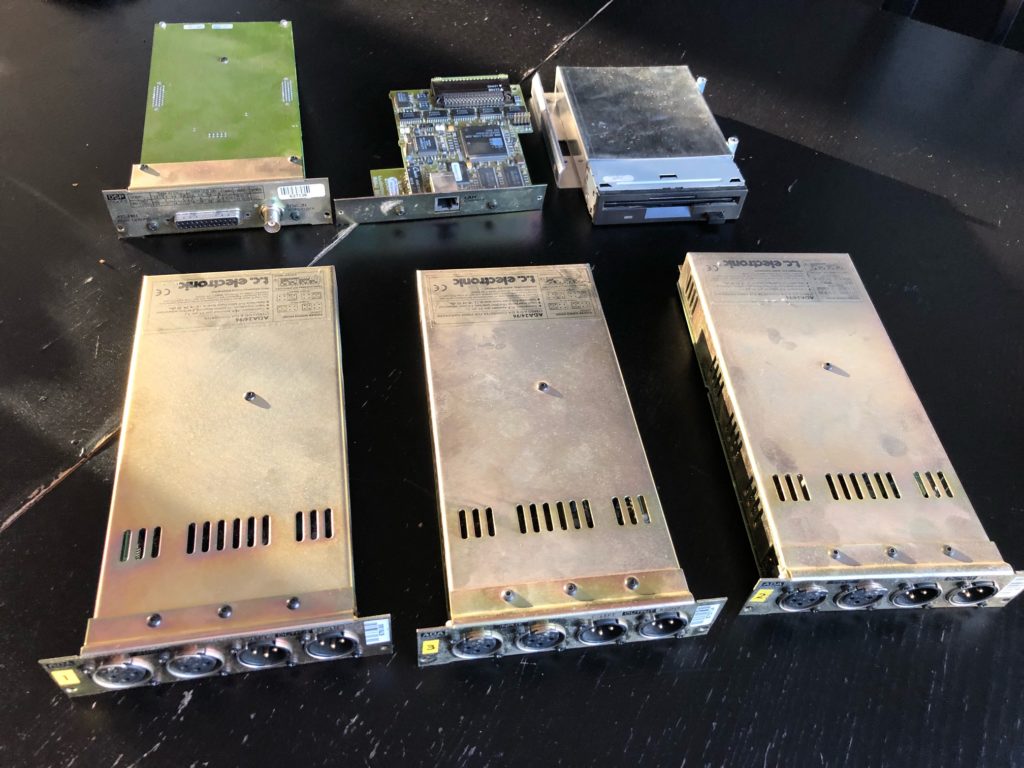
The mainframe unit contains the following parts:
A power supply
A floppy disk drive
The AES/DSP cartridge
The AD/DA cartridge(s)
A network card
The mainboard
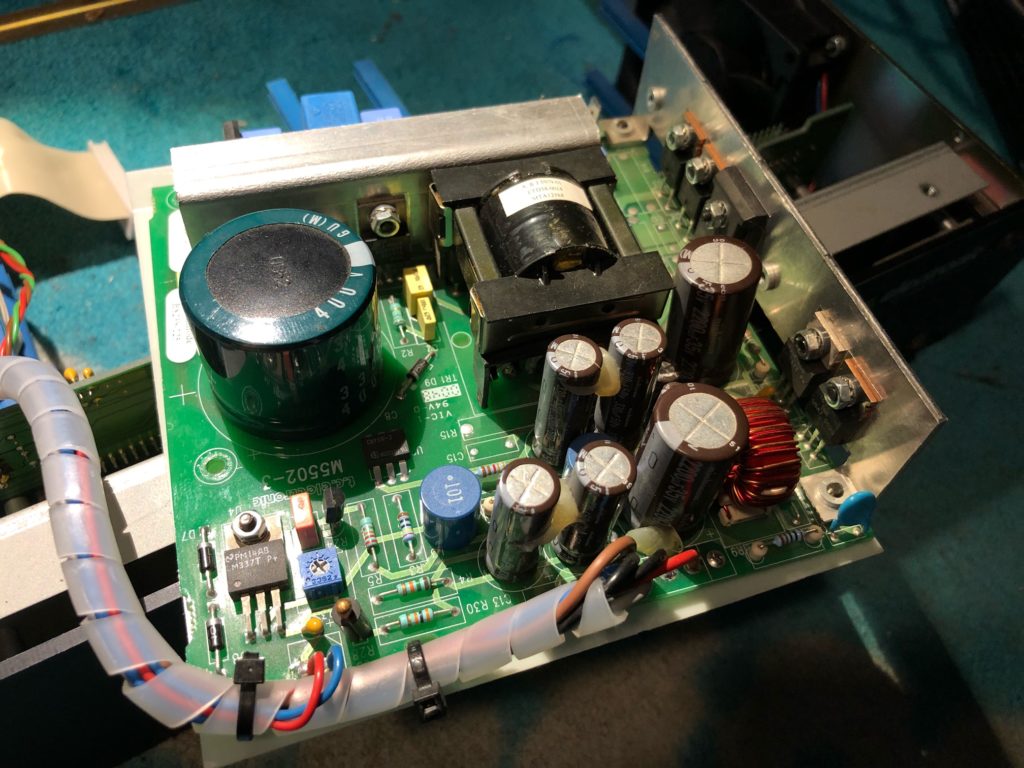
Power supply
The power supply unit delivers +/-5V and +/-20V:
Black / Red 5V
Black / Gray -5,2V
Black / Brown 20,5V
Black / Blue -21V
There’s also two wires connected to the fan (and a temperature probe): red/blue 5V. The potentiometer is probably used to adjust the temperature level triggering the fan.
Motherboard
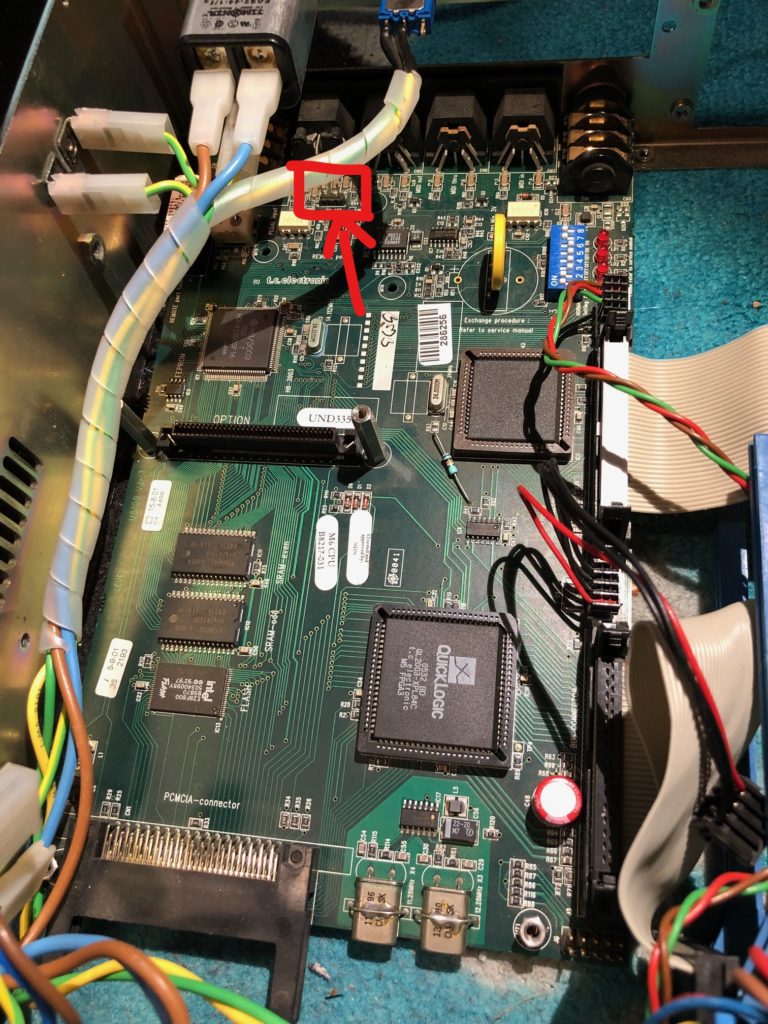
Taking a look inside the unit shows the following:
the internal DIP switches are in default position: ON ON OFF OFF OFF OFF ON ON
the LEDs are in the following state: ON OFF OFF BLINK
I tried booting without additional units (AD/DA, DSP, floppy disk drive, ethernet card) without success.
I also tried replacing the floppy disk drive with a Gotek floppy to USB emulator. This actually didn’t worked, the floppy drive is still not accessed. Since the Gotek drive has many configuration options it’s hard to tell if it’s normal.
The motherboard hosts:/
H8/3003, 16bits microcontroller
A QuickLogic FPGA
A floppy disk drive controller
Two RAM chips
A Flash chip
As far as I understand the system, the H8 is in charge of the boot process: read from the floppy disk drive (through the floppy disk drive controller) firmware updates. If found, flash the H8 bootloader itself (on the Flash chip) or the FPGA.
The bootloader firmware « M6bv20.ins » seems to contain debug strings, so there’s may be some serial output for debugging purpose.
The schematics shows that the H8 has two serial ports, and following these brings us to the DIN 7 « Remote port » at the back of the unit. The Serial port 1 (Tx0/Tx0) is connected as follow:
pin 2 : GND
pin 3: Tx
pin 4: Rx+
pin 5: Rx-
Moreover, the unused JP3 connector also exhibits the same serial port and really looks like a debug interface:
pin 1 (closest to the board corner): GND
pin 2 : Rx
pin 3: Tx
I used an USB to serial adapter to connect to this port, hoping for a terminal connection (or at least debug strings). Sadly, the port seems to be inactive, at least at this part of the boot process.
Reverse & DIP switches
The motherboard schematics provides interesting information on the DIP switches usage:
DIP #
ON
OFF
1 (sw1A)
Send boot_cs to inernal flash cs (Chip Select)
2 (sw1B)
Send pcmcia_mem_cs to fpga pcm_bus_cs
3 (sw1C)
Send boot_cs to fpga pcm_bus_cs
4 (sw1D)
Send pcmcia_mem_cs to flash cs
5 (sw1E)
Connect H8 MD2 to GND
Put 5V on the H8 MD2
6 (sw1F)
Put 5V on the H8 MD0/MD1
Connect H8 MD0/MD1 to GND
7 (sw1G)
Connect sram_cs to RAM chips CS
Disable external RAM
8 (sw1H)
Connect flash_cs to FLASH
Disable Flash
According the the schematic labels we also learn:
Set switches 1 and 2 to ON for ROM boot
Set switches 3 and 4 to ON for « CARD » boot (pcmcia sram)
Set switches 5 and 6 to ON for 8bits operation (16 bits otherwise)
ROM boot: (1&2)
The switches 1 and 2 are ON by default, which makes sense: the unit is supposed to boot on the ROM. When switch 1 is set to ON, the boot_cs (a signal used to enable/disable a chip, thus select who’s going to read data sent on a bus) is connected to the flash memory cs. The switch 2 connects the pcmcia_mem_cs (again, a signal used to enable access to the PCMCIA) to the FPGA. I guess the FPGA is in charge of driving the PCMCIA.
During boot: read flash memory
After boot, when using PCMCIA: use pcmcia
CARD boot: (3&4)
When set to ON, the 3 and 4 switches enable the CARD boot. Thanks to the 3rd switch, boot_cs signal is sent to the FPGA pcm_bus_cs, which probably propagates this to the PCMCIA slot. During boot, the PCMCIA card is then enabled. The switch 4, connects the pcmcia_mem_cs to the external flash cs, thus when accessing the PCMCIA slot after the boot process, the unit will actually read the external flash.
During boot: read pcmcia
After boot, when using PCMCIA: use external flash
Here I learned something protentially fixing my issue: I suspect the bootloader to be corrupted and thus not accessing the floppy disk drive. If if use CARD boot mode, with a pcmcia sram memory card contaning the boot image (« M6bv20.ins ») raw written on it, I may actually bypass the flash memory issue. I found some technical documentation explaining that the M6bv20.ins should be copied to a floppy disk, then flashed on the SRAM pcmcia using a M5000 unit (« Wizard to disk » tool).
8/16 bits (5&6):
Switches 5 and 6 interacts with the H8/3003 MD0, MD1 and MD3 pins.
Mode 3: Address pins A23 to A0 are enabled, permitting access to a maximum 16-Mbyte address space. The initial bus mode after a reset is 8 bits, with 8-bit access to all areas. If at least one area is designated for 16-bit access in ABWCR, the bus mode switches to 16 bits.
Mode 4: Address pins A23 to A0 are enabled, permitting access to a maximum 16-Mbyte address space. The initial bus mode after a reset is 16 bits, with 16-bit access to all areas. If all areas are designated for 8-bit access in ABWCR, the bus mode switches to 8 bits.
So clearly, these two switches are used to select 8 or 16bits memory addressing, keeping the default position to 16bits (off/off) is a good option since I do not plan to rewrite the whole firmware 🙂
External RAM (7)
When OFF, switch 7 disables the two external RAM chips, thus the H8 CPU can only use its internal memory. Clearly we don’t want this and we’ll let this switch to ON.
External Flash (8)
When OFF, switch OFF disables the Flash chip during flash operations. Again, we don’t want this and we’ll let this switch to ON.
Reverse & JTAG
The J6 connector is a JTAG debug interface, connected to the FPGA. It’s probably used to load the fpga firmware in the factory. Since I don’t have a JTAG probe (and passing sniffing is pointless), it’s currently useless.
Factory setup
As far as I currently understand the motherboard, I suppose that:
the H8 firmware is loaded using the DIP Switch 3&4 and a PCMCIA card with the bootloader firmware written. Thus, the H8 boots properly and is then able to « update » the bootloader using the floppy disk, writing the program on the flash.
the FPGA firmware is loaded using the JTAG interface, probably prior to the H8, since the FPGA seems to be in charge of controlling the floppy disk driver.
Host Bus interface
I used my Salaea probe to watch traffic from the motherboard to the Host Bus Interface card. I didn’t tried to decode the whole traffic, but clearly there’s some.
Flash memory bus
I’m currently trying to scan the accesses to the flash memory bus, hoping it may help me to find what’s going on. The best place to sniff the bus seems to be the Ethernet card: the card shares the BUS with the flash chip, and the connector can easily be used to connect my probes. I’ll have to collect 3 bits lanes for each run and then reassemble, my Salaea is the 4 channel version. 1 channel will be used for the Clock (pin 43) and the 3 others for data.
So your keyboard has a Pitch Wheel but not an aftertouch one? Worse, keyboard still uses channel 7 (and you’ve lost the manual) and you want Aftertouch events to be sent on channel 1.
It’s pretty easy so setup a simple configuration to convert Pitch Wheel messages into Aftertouch.
The header section of the figuration file is again qui simple, just set the input MIDI interface and the output one.
We can achieve our use case with just one simple rule.
Filter:
On the filter section, we set MsgType to « Pitch Wheel » in order to look for these messages on our input interface.
We use ‘7’ for midi channel because your Pitch Wheel events are sent on this channel (and you’ve lost the manual, remember).
We set the Pitch value to ‘*’ because we want to process all values.
Transform:
Again we won’t use the Transform section here, we want to map the complete pitch range (0 to 127) to aftertouch events (0 to 127), so we set it to « None ».
Generator:
We want to send Aftertouch events, so we set MsgType to « Aftertouch ».
We want to re-emit the message on the channel 1 instead of the original 7 channel: we set the Channel to ‘1’.
Now comes the (almost)-tricky part:
Pitch Wheel have Pitch values
Aftertouch have Pressure values
We want to copy the pitch value read from the Pitch Wheel event to the pressure value of the Aftertouch event. We canot use « * » as a Pressure value because Pitch Wheel and Aftertouch are distinct events.
On a Generator configuration, values can be set to:
A given hardcoded value (what we did for the MIDI Channel)
‘*’: The original value of same type (what we did on our previous example with Note on events)
‘$’: The extracted value from the captured message
What value is extracted from the Pitch Wheel message? The Pitch value!
So by using « Pressure »: « $ » we just copy the extracted Pitch value to the Pressure value.
By using a similar technique, you could also use the Pitch Wheel to generate NoteOn events, use Notes to generate Program Change events and so on!
Let’s start with a very simple use case: « I want to forward all messages received on my input MIDI interface to my output MIDI interface ».
This may typically happen when you have a MIDI Usb keyboard connected to your audio interface and you want to send everything to you freshly acquired analog synthesizer connected to your MIDI output.
Our configuration file will first specify your MIDI input and output devices.
Simply run MIDIRouter with no arguments to list available devices:
Usage: ./midirouter <config file>
MIDI inputs:
   Périphérique MIDI USB
   Korg
   MOOG
   Faderfox EC4
   Port 1
   Port 2
   Port 3
   Port 4
   Port 5
   Port 6
   Port 7
   Port 8
MIDI outputs:
   Périphérique MIDI USB
   Korg
   MOOG
   Faderfox EC4
   Port 1
   Port 2
   Port 3
   Port 4
   Port 5
   Port 6
   Port 7
   Port 8
Let’s say I want to route everything from « Korg » to « MOOG ».
The « DefaultPassthrough » simply tells the MIDIRouter to forward all messages not matching any other rule. Since we don’t have any other rule set, this default behaviour will match all captured messages on the input interface.
The « Verbose » option is useful when setting everything up: it will show a message everytime a MIDI event is received (you can switch it to ‘false’ once everything works fine).
Note On/off forward only
On our previous example we’ve used the DefaultPassthrough feature to allow a complete forward of all messages from the input MIDI device to the output MIDI device.
Now we may not want to send everything to our vintage Analog Synth since it only supports NoteOn and NoteOff MIDI mesages. In order to do that, we will use what is the main feature of MIDIRouter: « rules ».
A « Rule » is built using three main sections:
A filter which describes what kind of MIDI message to look for on the input MIDI interface
A transformation which optionally defines how you want to change the extracted value
A generator which describes what kind of MIDI message to replay on the output MIDI interface
Our complete forward scenario is quite simple:
Filter: we want to match any Note On or Note Off message whatever the MIDI channel, value or velocity
Transform: we don’t want to transform anything
Generator: we want to replay using the same type of MIDI message (Note on, note Off), same MIDI channel, same note, same Velocity
We will here need two rules, one for the Note On events and one for the Note Off events.
Let’s start with Note On forward.
{
    "SourceDevice": "Korg",
    "DestinationDevice": "MOOG",
    "DefaultPassthrough": false,
    "Verbose": true,
    "Rules": [
        {
            "Name": "Raw forward of any Note On",
            "Filter": {
                "Name": "Note On in (I can write anything here)",
                "MsgType": "Note On",
                "Channel": "*",
                "Settings": {
                    "Note": "*",
                    "Velocity": "*"
                }
            },
            "Transform": {
                "Mode": "None"
            },
            "Generator": {
                "Name": "Note On out",
                "MsgType":"Note On",
                "Channel": "*",
                "Settings": {
                    "Note": "*",
                    "Velocity": "*"
                }
            }
        }
    ]
}
In the first part of this configuration file, we have the same section defining the input and output. Note that we’ve disabled the Defaultpassthrough option.
Then we have the « Rules » array which – for now – only contains one rule for our « Note On » events. The « Name » fields can be used to put any comments to be used for display only.
The « Filter » is built using:
MsgType: the type of midi message to look for (among « Note On », « Note Off », « Aftertouch », « Control Change », « Program Change », « Channel Pressure », « Pitch Wheel »). Here we set it to « Note On »
Channel: the MIDI channel to look for (1 to 16). Here we want to match any channel and use ‘*’.
Now comes the « Note On » specific settings which are « Note » (the note value) and « Velocity ». Since we want to match any note or velocity, we use ‘*’ again.
Then comes the « Transform » entry which would technically allow us to transform a note to another one. Here we just want to replay the MIDI message as it, so we use « None ».
The « Generator » section describes what kind of MIDI message we want to generate when a MIDI message matching our filter is captured. These settings are quite similar to the filter settings.
MsgType: the type of midi message to generate (among « Note On », « Note Off », « Aftertouch », « Control Change », « Program Change », « Channel Pressure », « Pitch Wheel »). So here we set it to « Note On »
Channel: the MIDI channel to set (1 to 16). Here we want reuse the same MIDI channel found on the captured Note on, we set it to « * ».
Now comes the « Note On » specific settings which are « Note » (the note value) and « Velocity ». Since we want to replay the same note and velocity, we use ‘*’ again.
And that’s it: the rule will match all Note on events and replay them to the output interface using the exact same settings (MIDI channel, note, velocity).
Because we want to send also Note Off messages, we add another rule with very similar settings:
On the next article, we will see how we can send Pitch Wheel events captured on a given MIDI channel to another MIDI channel and transform them to Aftertouch events:
I’ve developped a tool for MacOS called « MIDIRouter » which does what the name implies: it’s able to route (and transform) MIDI messages over MIDI interfaces.
Before going deeper into its features, let’s try to understand what I’m trying to achieve.
I have a few multi-effects on my studio (an Ensoniq DP/4, a Digitech Studio Quad v2) and actually I don’t use them that much. They’re behind me on a rack which is not really convenient to update settings and listen to the results, especially for reverbs.
Using the EC4, I’m able to associate any VPot to a given MIDI mesage type: send a program change, a control change (pitch bend, aftertouch, Note On, etc.) and customize displayed text to my needs.
This looked quite promizing, but the EC4 has some limitations:
When using a ControlChange, displayed value does not necessarily match with the ouput value. Control Changes values can be 7 bits (0 to 127) or 14 bits (0 to 16383) while I can setup displayed value to (0, 127), (0,1000), etc.
The Ensoniq DP/4 requires proprietary Sysex messages to change its parameters, this is not supported by the EC4
I plan to use the EC4 for other purposes (control DAW plugins is among them), so I want it to be connected to my Mac and forward some messages to my effects chain
So I needed a software that would be able to:
Watch an input MIDI device for a certain type of messages (with wildcard support)
Extract a value (7bits or 14bits) from those messages (a program value from a Program Change, a control value from a Control Change, etc.
Remap the value to the expected output value range (« my EC4 shows a value in the range [0-100], sends a [0-127] value and I want to then to my effect a [0-64] value »)
Re-emit a MIDI message to the output interface using eventually another MIDI message type (« transform the EC4 Control Change messages into DP/4 Sysex messages) including the extracted value
Lorsque vous avez terminé vos enregistrement, votre session Logic contient toute une série de fichiers audios ou midis. Certains sont utilisés, certains correspondent à des prises que vous avez faites mais que vous n’avez pas retenus et certains fichiers peuvent être situés « ailleurs » sur votre disque (issus de banques de sons par exemple).
Il est nécessaire d’exporter proprement votre session Logic avant de l’envoyer afin de:
– Réduire sa taille en supprimant les fichiers qui ne servent à rien
– Rassembler tous les fichiers dans la session Logic et faire en sorte qu’elle ne fasse pas référence à des fichiers restés sur votre ordinateur
Commencer par afficher le « Browser » en cliquant sur l’icone « medias » en haut à droite (raccourci clavier: « F »).
Logic affiche la liste des fichiers utilisés par le projet. Rendez vous dans le menu Edit et cliquez sur « Select Unused » (raccourci cavier: Shift + U).
Logic sélectionne tous les fichiers du projet qui ne sont pas utilisés par la session.
Rendez vous maintenant dans « Audio Files » et cliquez sur « Delete Files » (raccourci clavier: Command + backspace).
ATTENTION: cette opération va supprimer les fichiers du disque. Si vous envisagez de réutiliser finalement certains des prises, pensez à faire une copie de sauvegarde du projet avant!
Votre session vient de s’alléger de quelques Go, reste désormais à rassembler tous les fichiers du projets dans une seule session.
Rendez vous dans le menu « Files » et cliquez sur « Save a copy as… ».
Dans la boite de dialogue, pensez a bien cocher toutes les cases, notamment « Audio Files ».
C’est terminé ! Le projet sauvegardé contient tous les éléments utilisés par votre projet, et rien que ceux-ci !
Nous sommes en 2021 et aujourd’hui, avec un bon ordinateur, une paire d’enceintes correctes (ou à défaut un bon casque) je devrais avoir tout ce qu’il faut pour mixer.
J’ai une belle collection de plugins, qui émulent d’une manière générale plutôt bien des équipements de studio vintage qui valent plus cher que ma voiture.
Alors pourquoi est-ce que je m’acharne à travailler avec une console en face de moi ? Pourquoi j’envisage d’en acheter une nettement plus grosse ? Pourquoi je m’ennuie à acheter ou monter des équipements en rack alors que j’ai grosso modo les même en plugin ?
Je me souviens d’une video de Chris Lord-Alge qui fondamentalement expliquait que sa console était son instrument à lui. Bien sûr vous pouvez demander à Jimmy Page de jouer sur une copie de Fender à 50€, il en sortira probablement quelque chose d’incroyable. Mais pourquoi irait-il s’abimer les doigts sur une mauvaise guitare alors qu’il pourrait sortir quelque chose de meilleur, plus facilement, en prenant du plaisir, avec un bel instrument ?
Travailler sur une console, pour moi c’est la même chose: bien sûr je pourrais aller cliquer sur un bouton de fader dans Protools, mais où est le plaisir ?
J’ai passé les 20 premières années de ma vie professionnelle à travailler dans la cybersécurité, derrière un ordinateur. Même si j’ai adoré toutes ces années, je n’ai pas changé de carrière pour simplement passer d’un logiciel à un autre.
Pire: je suis fondamentalement convaincu que je mixe mieux derrière une console qu’avec une souris à la main. Une console c’est tactile, vous sentez les boutons, vous entendez comment le mix réagit lorsque vous touchez à un réglage.
Si vous faites les même opérations à la souris, vous introduisez un nouvel élément: la vue. Ce n’est plus une interaction main -> son, mais c’est un combo main -> écran -> son, et fondamentalement cela change tout pour moi.
On a tous fait l’expérience de fermer les yeux pour écouter de la musique et plus facilement accéder aux détails de celle-ci, preuve que la vue vient effectivement jouer au trouble fête en forçant le cerveau à analyser des informations qui ne sont pas utiles dans ce contexte. Avec une console en face de moi, je peux ignorer ce que je vois (ce qui avec mon niveau de myopie est en pratique assez facile) et me concentrer sur l’essentiel: le son.
Par extension c’est précisément la même chose sur tous mes équipements en rack: tourner un bouton physique est plus efficace que d’aller cliquer sur un bouton de plugin.
Je n’irai pas non plus tomber dans le travers du tout analogique: le concept est attrayant mais à l’usage c’est beaucoup de contraintes. On tombe alors dans le studio hybride, mélangeant du logiciel (donc des plugins), une console (qui peut être un simple contrôleur DAW) et quelques équipements en rack.
Pour moi c’est le meilleur compromis entre efficacité et plaisir de mixer!
Du 18 au 28 février 2021 j’organise les « Folk Days » avec une offre à 50€ pour votre titre Folk, mixé et masterisé.
Vous avez passé les derniers confinements enfermé chez vous avec votre guitare et cette vieille compo que vous jouez depuis 12 ans à vos potes ?
Il est peut être temps d’en faire quelque chose de propre…!
Comment cela se passe ?
Vous enregistrez votre titre Folk (donc essentiellement guitare voix, 5 pistes max) avec les moyens du bord
Vous m’envoyez votre session (wetransfer, Dropbox, Google Drive..) pour avoir un avis gratuit : est-ce mixable ou faut-il refaire des prises ?
Vous me donnez le nom d’un titre de référence (« j’aimerai que ça sonne comme… ») et la/les plateformes sur lesquelles vous envisagez de le diffuser
Je vous envoie la version masterisée, prête à être diffusée
Si certaines choses ne vous vont pas, vous avez le droit à un aller retour pour des correctifs
Conditions:
Paiement à l’étape 2.
Je ne prends pas en charge la diffusion du titre ni son référencement (SDRM, Sacem…)
Tous les envois (étape 2) effectués du 18 au 28 février peuvent bénéficier de la promo, même si les étapes suivantes débordent de la période!
Les sessions peuvent être des projets Garageband, Logic ou Protools. Si vous utilisez un autre DAW, vous pouvez exporter les pistes une a une en WAV après avoir désactivé vos différents effets (EQ, compresseurs, reverbs..) ainsi qu’un bounce en l’état de votre mix maison.
Lorsque l’on fait partie d’un groupe indépendant, on s’occupe par définition de tout: des compos, des enregistrements, du matériel, de la promo…
On vit une époque où on a la chance d’avoir du matériel audio d’une qualité très correcte à des prix vraiment accessibles. Quand j’ai commencé à faire du son dans les années 90, la configuration de base pour enregistrer un album tapait dans les 20 k€. A ce prix là, le super projet d’album du groupe finissait généralement enregistré au dictaphone et l’aventure s’arrêtait là.
Aujourd’hui avec un Mac de base, Garageband, une interface audio à 200€ et un micro a 100€ on a de quoi sortir un titre parfaitement « écoutable ».
J’ai créé mon studio de mixage pour accompagner ces groupes, leur donner la possibilité de finaliser ces morceaux et les faire passer au stade d’après: obtenir un titre « radio ready ». L’accompagnement ça n’est pas simplement prendre les pistes qui ont été enregistrées puis sortir un mix avec l’excuse: « Ça ne sonne pas trop, mais bon avec les pistes que j’ai eu aussi … »
Accompagner un groupe cela se passe souvent avant même les premières prises: conseiller pour l’achat d’un nouveau micro, valider (ou pas 🙂 ) une installation, conseiller sur la façon de faire les prises, celles qui doivent être doublées, le placement des micros… Ensuite vient le temps de valider les pistes qui ont été faites: parfois on peut corriger certains problèmes au mix, parfois c’est plus simple de refaire la prise. Pour finir il y a aussi l’accompagnement artistique: même si un ingé de mixage doit rester à sa place (je ne suis pas producteur), il m’arrive de proposer quelques arrangements sur des morceaux, car lors de mix on se rend compte que certains passages sont « plats ».
Dans tous les cas, la décision finale revient au groupe: le seul et unique critère de qualité valable d’un mix est qu’il plaise à l’artiste (et a son public, accessoirement) !
On peut essayer de prendre la question dans tous les sens, la conclusion sera la même: la crise du COVID19 met à mal une industrie musicale encore bien fragile.
Les artistes gagnent leur vie essentiellement grâce aux concerts et il n’y en a pour ainsi dire plus depuis bientôt un an.
J’ai toujours joué dans des groupes auto-produits, où l’on a l’habitude de faire beaucoup avec peu de moyens. Nos ventes d’albums servaient essentiellement à financer le pressage de l’album en question, et un peu de matériel.
Fondamentalement j’ai l’impression que les groupes purement indé seront peut être moins impactés que les autres par la crise. Ils enregistrent généralement chez eux avec leur propre matériel et on souvent un « job alimentaire » à coté pour tenir le coup.
Avec les confinements j’ai vu démarrer pas mal de projets (quitte à être enfermé avec des instruments et des micros..) qui devraient voir le jour dans les mois qui viennent. Pour enchaîner avec une série de concerts quand cela sera de nouveau possible ?